Chapter 8 Log in, log out
Chapter 8 Log in, log out
Now that new users can sign up for our site (Chapter 7), it’s time to give them the ability to log in and log out. We’ll be implementing all three of the most common models for login/logout behavior on the web: “forgetting” users on browser close (Section 8.1 and Section 8.2), automatically remembering users (Section 8.4), and optionally remembering users based on the value of a “remember me” checkbox (Section 8.4.5).1The authentication system we develop in this chapter will allow us to customize the site and implement an authorization model based on login status and identity of the current user. For example, in this chapter we’ll update the site header with login/logout links and a profile link. In Chapter 9, we’ll impose a security model in which only logged-in users can visit the user index page, only the correct user can access the page for editing their information, and only administrative users can delete other users from the database. Finally, in Chapter 11, we’ll use the identity of a logged-in user to create microposts associated with that user, and in Chapter 12 we’ll allow the current user to follow other users of the application (thereby receiving a feed of their microposts).
This is a long and challenging chapter covering many detailed aspects of login common systems, so I recommend focusing on completing it section by section. In addition, many readers have reported benefiting from going through it a second time.
8.1 Sessions
HTTP is a stateless protocol, treating each request as an independent transaction that is unable to use information from any previous requests. This means there is no way within the hypertext transfer protocol to remember a user’s identity from page to page; instead, web applications requiring user login must use a session, which is a semi-permanent connection between two computers (such as a client computer running a web browser and a server running Rails).The most common techniques for implementing sessions in Rails involve using cookies, which are small pieces of text placed on the user’s browser. Because cookies persist from one page to the next, they can store information (such as a user id) that can be used by the application to retrieve the logged-in user from the database. In this section and Section 8.2, we’ll use the Rails method called
session to make temporary sessions that expire automatically on browser close,2 and then in Section 8.4 we’ll add longer-lived sessions using another Rails method called cookies.It’s convenient to model sessions as a RESTful resource: visiting the login page will render a form for new sessions, logging in will create a session, and logging out will destroy it. Unlike the Users resource, which uses a database back-end (via the User model) to persist data, the Sessions resource will use cookies, and much of the work involved in login comes from building this cookie-based authentication machinery. In this section and the next, we’ll prepare for this work by constructing a Sessions controller, a login form, and the relevant controller actions. We’ll then complete user login in Section 8.2 by adding the necessary session-manipulation code.
As in previous chapters, we’ll do our work on a topic branch and merge in the changes at the end:
$ git checkout master
$ git checkout -b log-in-log-out
8.1.1 Sessions controller
The elements of logging in and out correspond to particular REST actions of the Sessions controller: the login form is handled by thenew action (covered in this section), actually logging in is handled by sending a POST request to the create action (Section 8.2), and logging out is handled by sending a DELETE request to the destroy action (Section 8.3). (Recall the association of HTTP verbs with REST actions from Table 7.1.)To get started, we’ll generate a Sessions controller with a
new action:$ rails generate controller Sessions new
new actually generates views as well, which is why we don’t include actions like create and destroy that don’t correspond to views.) Following the model from Section 7.2 for the signup page, our plan is to create a login form for creating new sessions, as mocked up in Figure 8.1.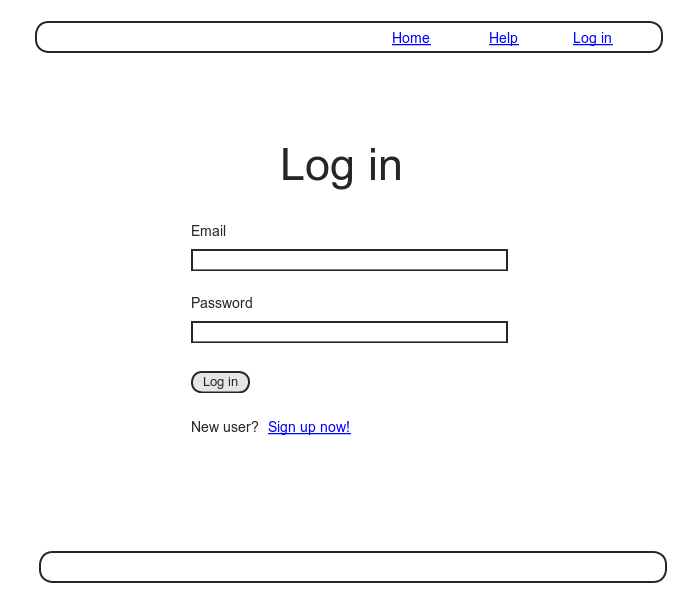
Figure 8.1: A mockup of the login form.
resources method to obtain a full suite of RESTful routes automatically (Listing 7.3), the Sessions resource will use only named routes, handling GET and POST requests with the login route and DELETE request with the logout route. The result appears in Listing 8.1 (which also deletes the unneeded routes generated by rails generate controller).
Listing 8.1:
Adding a resource to get the standard RESTful actions for sessions. config/routes.rb
Rails.application.routes.draw do
  root                'static_pages#home'
  get    'help'    => 'static_pages#help'
  get    'about'   => 'static_pages#about'
  get    'contact' => 'static_pages#contact'
  get    'signup'  => 'users#new'
  get    'login'   => 'sessions#new'
  post   'login'   => 'sessions#create'
  delete 'logout'  => 'sessions#destroy'
  resources :users
end
| HTTP request | URL | Named route | Action | Purpose |
GET |
/login | login_path |
new |
page for a new session (login) |
POST |
/login | login_path |
create |
create a new session (login) |
DELETE |
/logout | logout_path |
destroy |
delete a session (log out) |
Table 8.1: Routes provided by the sessions rules in Listing 8.1.
rake routes:$ bundle exec rake routes
Prefix Verb URI Pattern Controller#Action
root GET / static_pages#home
help GET /help(.:format) static_pages#help
about GET /about(.:format) static_pages#about
contact GET /contact(.:format) static_pages#contact
signup GET /signup(.:format) users#new
login GET /login(.:format) sessions#new
POST /login(.:format) sessions#create
logout DELETE /logout(.:format) sessions#destroy
users GET /users(.:format) users#index
POST /users(.:format) users#create
new_user GET /users/new(.:format) users#new
edit_user GET /users/:id/edit(.:format) users#edit
user GET /users/:id(.:format) users#show
PATCH /users/:id(.:format) users#update
PUT /users/:id(.:format) users#update
DELETE /users/:id(.:format) users#destroy
8.1.2 Login form
Having defined the relevant controller and route, now we’ll fill in the view for new sessions, i.e., the login form. Comparing Figure 8.1 with Figure 7.11, we see that the login form is similar in appearance to the signup form, except with two fields (email and password) in place of four.As seen in Figure 8.2, when the login information is invalid we want to re-render the login page and display an error message. In Section 7.3.3, we used an error-messages partial to display error messages, but we saw in that section that those messages are provided automatically by Active Record. This won’t work for session creation errors because the session isn’t an Active Record object, so we’ll render the error as a flash message instead.
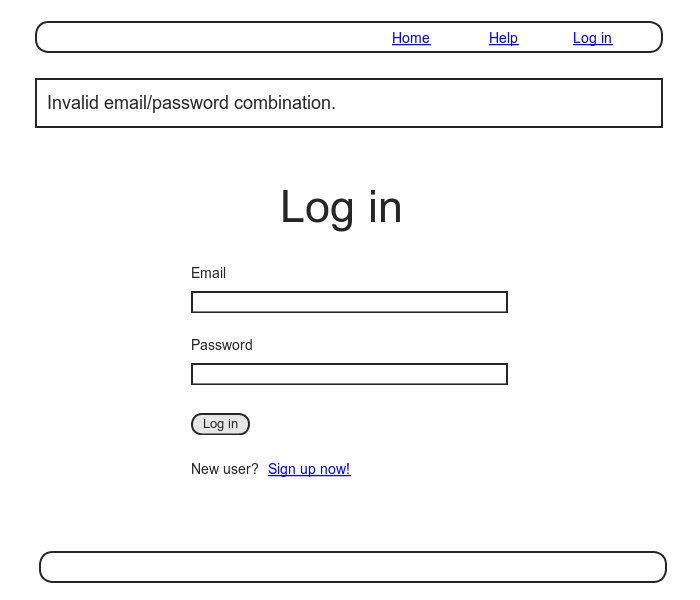
Figure 8.2: A mockup of login failure.
form_for helper, taking as an argument the user instance variable @user:<%= form_for(@user) do |f| %>
.
.
.
<% end %>
@user variable. This means that, in constructing the new session form, we have to give form_for slightly more information; in particular, whereasform_for(@user)
action of the form should be to POST to the URL /users, in the case of sessions we need to indicate the name of the resource and the corresponding URL:3form_for(:session, url: login_path)
form_for in hand, it’s easy to make a login form to match the mockup in Figure 8.1 using the signup form (Listing 7.13) as a model, as shown in Listing 8.2.
Listing 8.2:
Code for the login form. app/views/sessions/new.html.erb
<% provide(:title, "Log in") %>
<h1>Log in</h1>

<div class="row">
  <div class="col-md-6 col-md-offset-3">
    <%= form_for(:session, url: login_path) do |f| %>

      <%= f.label :email %>
      <%= f.email_field :email, class: 'form-control' %>

      <%= f.label :password %>
      <%= f.password_field :password, class: 'form-control' %>

      <%= f.submit "Log in", class: "btn btn-primary" %>
    <% end %>

    <p>New user? <%= link_to "Sign up now!", signup_path %></p>
  </div>
</div>
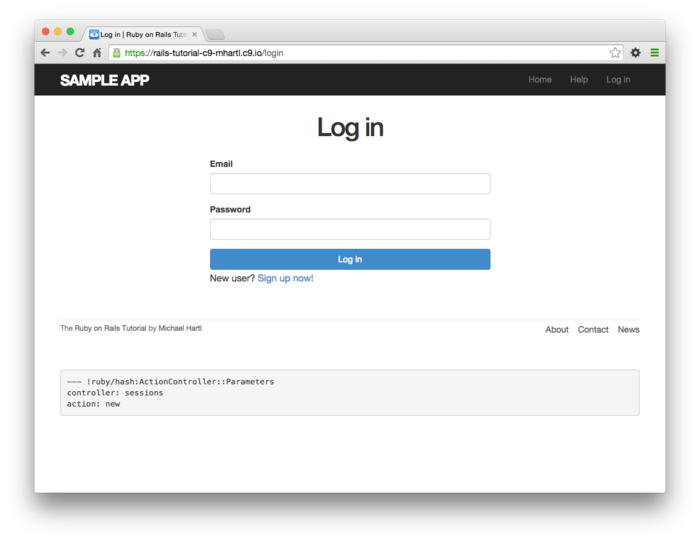
Figure 8.3: The login form.
Listing 8.3:
HTML for the login form produced by Listing 8.2.
<form accept-charset="UTF-8" action="/login" method="post">
<input name="utf8" type="hidden" value="✓" />
<input name="authenticity_token" type="hidden"
value="NNb6+J/j46LcrgYUC60wQ2titMuJQ5lLqyAbnbAUkdo=" />
<label for="session_email">Email</label>
<input class="form-control" id="session_email"
name="session[email]" type="text" />
<label for="session_password">Password</label>
<input id="session_password" name="session[password]"
type="password" />
<input class="btn btn-primary" name="commit" type="submit"
value="Log in" />
</form>
params hash where params[:session][:email] and params[:session][:password] correspond to the email and password fields.8.1.3 Finding and authenticating a user
As in the case of creating users (signup), the first step in creating sessions (login) is to handle invalid input. We’ll start by reviewing what happens when a form gets submitted, and then arrange for helpful error messages to appear in the case of login failure (as mocked up in Figure 8.2.) Then we’ll lay the foundation for successful login (Section 8.2) by evaluating each login submission based on the validity of its email/password combination.Let’s start by defining a minimalist
create action for the Sessions controller, along with empty new and destroy actions (Listing 8.4). The create action in Listing 8.4 does nothing but render the new view, but it’s enough to get us started. Submitting the /sessions/new form then yields the result shown in Figure 8.4.
Listing 8.4:
A preliminary version of the Sessions
create action. app/controllers/sessions_controller.rb
class SessionsController < ApplicationController

  def new
  end

  def create
    render 'new'
  end

  def destroy
  end
end
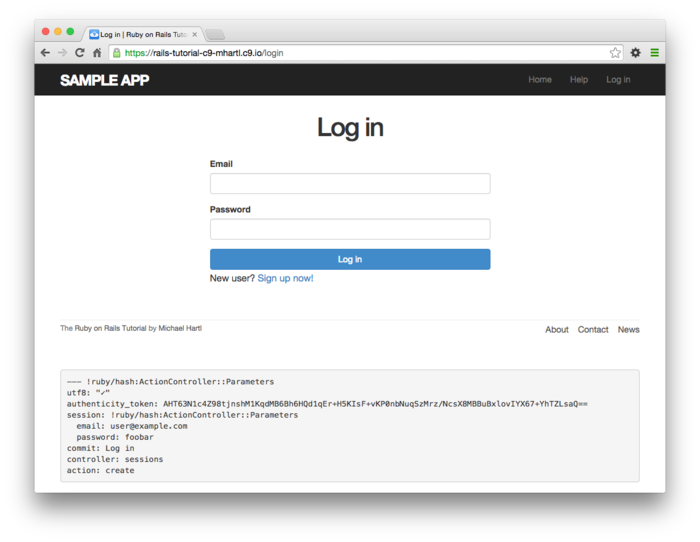
Figure 8.4: The initial failed login, with
create as in Listing 8.4.
params hash containing the email and password under the key session, which (omitting some irrelevant details used internally by Rails) appears as follows:---
session:
email: 'user@example.com'
password: 'foobar'
commit: Log in
action: create
controller: sessions
params contains a nested hash of the form{ session: { password: "foobar", email: "user@example.com" } }
params[:session]
{ password: "foobar", email: "user@example.com" }
params[:session][:email]
params[:session][:password]
In other words, inside the
create action the params hash has all the information needed to authenticate users by email and password. Not coincidentally, we already have exactly the methods we need: the User.find_by method provided by Active Record (Section 6.1.4) and the authenticate method provided by has_secure_password (Section 6.3.4). Recalling that authenticate returns false for an invalid authentication (Section 6.3.4), our strategy for user login can be summarized as shown in Listing 8.5.
Listing 8.5:
Finding and authenticating a user. app/controllers/sessions_controller.rb
class SessionsController < ApplicationController

  def new
  end

  def create
    user = User.find_by(email: params[:session][:email].downcase)
    if user && user.authenticate(params[:session][:password])
      # Log the user in and redirect to the user's show page.
    else
      # Create an error message.
      render 'new'
    end
  end

  def destroy
  end
end
downcase method to ensure a match when the submitted address is valid.) The next line can be a bit confusing but is fairly common in idiomatic Rails programming:user && user.authenticate(params[:session][:password])
&& (logical and) to determine if the resulting user is valid. Taking into account that any object other than nil and false itself is true in a boolean context (Section 4.2.3), the possibilities appear as in Table 8.2. We see from Table 8.2 that the if statement is true only if a user with the given email both exists in the database and has the given password, exactly as required.| User | Password | a && b |
| nonexistent | anything | (nil && [anything]) == false |
| valid user | wrong password | (true && false) == false |
| valid user | right password | (true && true) == true |
Table 8.2: Possible results of
user && user.authenticate(…).
8.1.4 Rendering with a flash message
Recall from Section 7.3.3 that we displayed signup errors using the User model error messages. These errors are associated with a particular Active Record object, but this strategy won’t work here because the session isn’t an Active Record model. Instead, we’ll put a message in the flash to be displayed upon failed login. A first, slightly incorrect, attempt appears in Listing 8.6.
Listing 8.6:
An (unsuccessful) attempt at handling failed login. app/controllers/sessions_controller.rb
class SessionsController < ApplicationController

  def new
  end

  def create
    user = User.find_by(email: params[:session][:email].downcase)
    if user && user.authenticate(params[:session][:password])
      # Log the user in and redirect to the user's show page.
    else
      flash[:danger] = 'Invalid email/password combination' # Not quite right!
      render 'new'
    end
  end

  def destroy
  end
end
flash[:danger] message automatically gets displayed; because of the Bootstrap CSS, it automatically gets nice styling (Figure 8.5).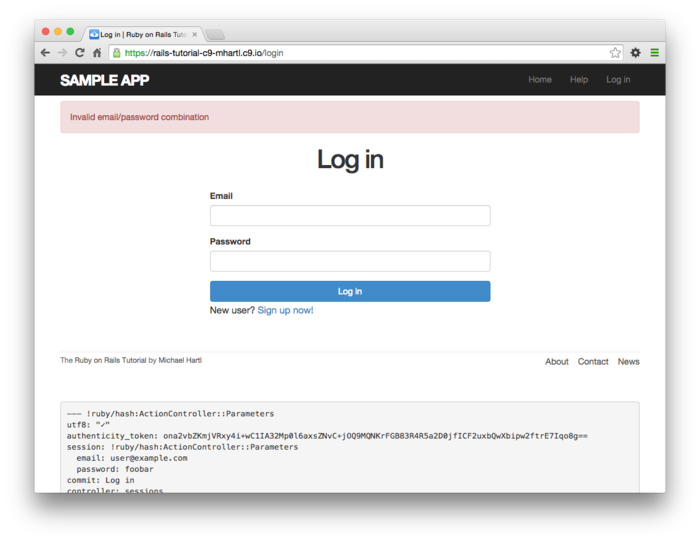


Komentar